These Tutorials will help you to be able to do the things required of the roles that you have been assigned.
There are a couple of ways to log into the backend of the site.
- Log in through the login menu item on the front end of the site. Input your username & password and on successful login, you will see a dark menu bar at the top of the browser window. Click the Hunter River Dragons title at the top left of the screen and you will be taken to the dashboard screen.
- type the URL into the address bar of your browser with /login appended, eg. hunterriverdragons.com.au/login. You will then be shown the WordPress login screen. Input your username & password, click Log In and you will be taken to the dashboard at the backend of the site.
Select Events > Add New from the dashboard.

Add in the event title where it says “Add title” at the top of the window see image below this text. Below that, you can fill in details regarding the event. You can add in images, PDF files or even links in this section

In the text editor window shown above, you can put details of the event as text, images, PDF files or anything that you can put into a normal text editor.

Add in the event date and times, the all day tick box will start the event at midnight and finish at midnight. You can set the time zone, but by default it will display Sydney time zone.

Create or select a venue and decide if you want to show a map or map link. If the tick box is ticked, the map will appear when you select the event listing on the Events page. Venues can also be created from the dashboard at the left of screen
The create or select an organizer for the event follows the same format as the location dropdown where you can select an organizer from the dropdown list or create an organizer by typing a new name in the input box. Organizers can also be added via the dashboard on the left.
Once complete, scroll to the top of the page and click the Publish button on the right hand side of the screen. The event has been created.
To remove an event

Select Events > Events to display all events. Select the tick box to the left of the event you want to delete and select the dropdown at the top of the page with “Bulk actions”. Select “Move to Trash” and then click “Apply”

To Edit an event
Select Events > Events to display all events. Hover your mouse over the title of the event you want to edit and you will see some options appear that you can click. Edit will open up the original create event with all information. Simply make your changes and then click the update button. Quick Edit will open up a summary screen with most of the editable options available. Make your changes and click Update to save. Trash will delete the single event. View will display the event in a browser window. EA Duplicator will create a copy of the event. You can use this if the bulk of the event is the same as the one you want to copy. You only need to make your changes to title, dates’ times etc. and click update to create an entire event. This would be a great way to create recurring events where you would only need to change the year for example.
We will simply duplicate the heading and gallery rather than creating a new gallery as all settings will be duplicated.
Open up the page in Elementor. Right click on the heading above a gallery. Select Duplicate. This will create a copy of the heading. Change the title text to whatever you want. Drag the heading down below the last gallery of images.
Right click the last gallery of images and select Duplicate. This will create a copy of the gallery. Drag the gallery under the heading you created in step 1.
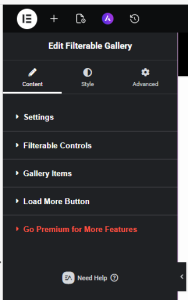
Click the Edit icon in top right corner of the gallery element to open up the editor on the left of screen. Click on Gallery Items tab to open up the images.
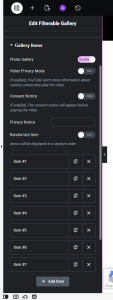
Scroll down and you will see the images marked as Item #1, Item#2 etc. You can delete any items by clicking the X or duplicate any by clicking the copy icon next to the X.
All you need to now is click the item you want to change. This will open up a dropdown section. Scroll down until you see the image, click that and it will allow you select a new image from the media library. Select or upload an image the usual way and this will substitute the current image with the newly selected image.
To reorder the images, simply click the item and drag it into its new position.
Click Publish to save the changes.
Adding New Videos to Gallery Page
Open the Gallery Page for editing with Elementor
You will see the video section that has been divided into 3 columns and 3 rows

Select a blank cell and add an image from the dashboard on the left of screen

Select Add Media from the top of the text editor and select or upload your image.
Select Style and set the image height to 220

Select content and set the image resolution, around 800 to 1000 should be ok
Select Custom Caption and type in the caption you want to display
Select Custom URL and add the URL of the video.
Click Update and check it on the live site.